Did you know that getting those super cute smiley faces and other emoji icons are now super easy to install on your iPhone? And that it's free? No more paying for an app or following crazy instructions. If you've recently updated your iOS then you are ready!
Go to this super quick tutorial to install your Emoji keyboard now! http://support.apple.com/kb/HT4976
Pin It
Tuesday, October 16, 2012
Friday, September 28, 2012
Conference Calling using your iPhone
Have you ever needed to call more than one person at once using your iPhone? I have! This is what I did so I could talk to all of my friends at once!
Wah lah! Enjoy and happy Friday!
Pin It
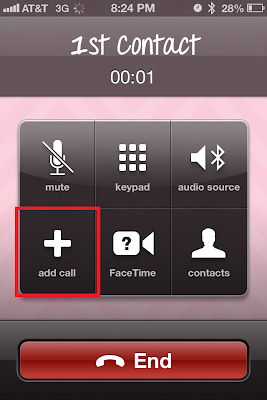
- Call the first person
- Select "add call"
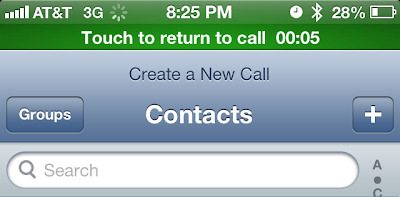
- Your contacts will appear... Choose the second person to call.
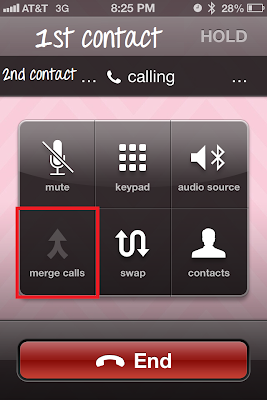
- Then your phone will appear again showing the 1st person on hold. Connect with the 2nd person, then press Merge Calls.
Wah lah! Enjoy and happy Friday!
Pin It
Labels:
Call,
Collaborate,
Conference,
iPhone,
Personal,
Phone
Tuesday, September 25, 2012
Filter Mail Items Automatically in Gmail
It seems like every time you go shopping these days they ask you for your email address to add you to their distribution list. Sometimes I really enjoy their email deals and coupons, but most of the time they are so annoying that I instantly delete!
Instead of having to manually delete these emails, you can create a filter in Gmail and send it to a folder, archive it, mark it as read, delete it, etc!
Here's how to:
Pin It
Instead of having to manually delete these emails, you can create a filter in Gmail and send it to a folder, archive it, mark it as read, delete it, etc!
- If you use Outlook for your work email, you probably already know how easy it is to create rules. Creating filters is very similar!
Here's how to:
- Check the box next to the email you wish to filter on.
- I have chosen to create a filter on my email from Smoothie King.
- Next, on the top menu, click More, and then choose Filter messages like these
- Now, set the filter. You can choose many things for your Filter: the sender, subject, words, has attachment, etc!
- I want my Filter to be based on if an email comes FROM the Smoothie King email address.
- The from text box is normally populated automatically.
- Click "Create filter with this search >>"
- Once you have chosen your filter options, you will be able to chose what actions Gmail should take for that filter. There are so many options available here like mark as read, delete it, apply the label, etc.
- I want to move all emails from the Smoothie King email address to my Shopping folder in Gmail automatically.
- I checked:
- Skip the Inbox (Archive It)
- Apply the label:
- I clicked the drop down box and chose Shopping.
- If you do not have any labels created and you would like to create one, click on the Drop Down then choose "New Label..."
- Also apply filter to __ matching conversation.
- Click "Create Filter"


Pin It
Labels:
Filters,
Folder,
Gmail,
Gmail Filter,
Google,
Inbox,
Label,
Mail,
Organize,
Outlook Rule,
Shopping
Thursday, September 20, 2012
My Favorite iOS 6 update so far: Do Not Disturb
You can set your iPhone to "do not disturb" at certain hours!
I got here by going to Settings > Notifications > Do Not Disturb
Pin It
I got here by going to Settings > Notifications > Do Not Disturb
Pin It
Thursday, September 6, 2012
Free Forwarding Phone Number using Google Voice
Have you ever needed to give your personal phone number to someone that you wish you didn't have to? I can think of a really good example: a salesmen!
Google Voice can create a free phone number for you that will forward to your personal phone(s)! The phone number is given to you, so you can use it with multiple devices.
My favorite feature of Google Voice is that you can access all of your voice mails and text messages sent to this Google Voice number online. I can even respond to text messages from my PC! More on that later :)
How to sign up and get your free phone number!
Pin It
Google Voice can create a free phone number for you that will forward to your personal phone(s)! The phone number is given to you, so you can use it with multiple devices.
You will need a Google account to get this feature.
If you don't already have one, sign up now!
My favorite feature of Google Voice is that you can access all of your voice mails and text messages sent to this Google Voice number online. I can even respond to text messages from my PC! More on that later :)
How to sign up and get your free phone number!
- Go to voice.google.com
- Sign into your Google account
- Click Continue
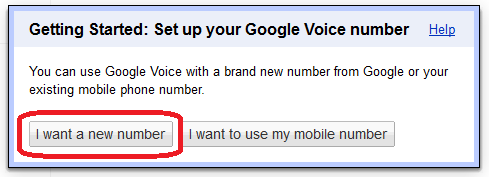
- Choose "I want a new number"
- Are you wondering what would happen if you chose "use my mobile number?" If you chose that, Google Voice would monitor your voicemails/texts on your current personal number.
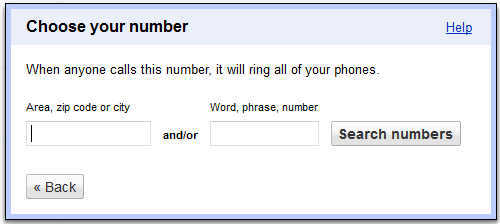
- Now, choose your number!
- How cool is this that you can choose a number? You could choose a word or phrase for your business and see if it is available!
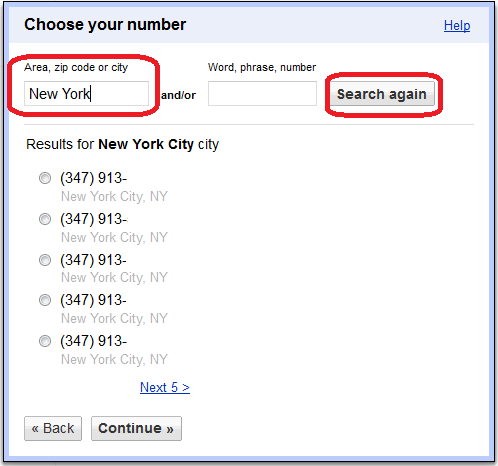
- I decided I wanted to have a New York City number so I entered New York into the "Area, zip code or city" Text box and clicked search numbers.
- They have so many options! Make sure to click "Next 5 >" to find a number that is good for you.
- Then click on the radio button next to the number you would like and click Continue >>
- Next, create a PIN for your voice mail access. Accept the terms and click Continue >>
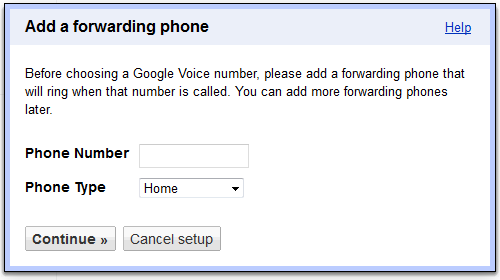
- Now, the forwarding portion... You will enter your personal phone number here so that this new Google Phone number will forward to your personal phone.
- Click Continue >>
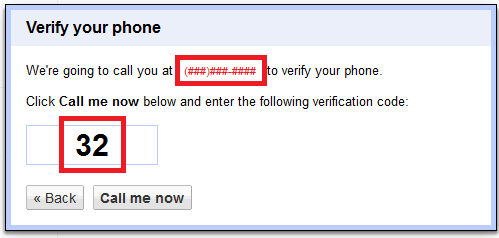
- Now, have your personal phone ready for this step! You're going to verify your personal phone number is yours. The red box with (###) ###-#### I have below should display your personal phone number. Also, take note of your verification code. Mine was 32. Then click "Call me now" and enter the verification code that is given to you.
- Once you have entered your verification code from your personal phone, the following will pop up:
- Take note of your new phone number and start using it!
Now I would definitely take a few minutes to check out the settings for your new Google voice number.
Don't forget to download the Google Voice app for your mobile device to use more features on the go!
Apple | Android
Especially for this reason: Google Voice will automatically screen all phone calls to your Google Voice number. So if someone calls your Google Voice number, they will need to state their name, in order to get to you. So, if you want to modify this feature or turn it off, do this under "Calls":
There's tons of advantages to having this Google Voice number! You've gotta check it out!
Don't forget to download the Google Voice app for your mobile device to use more features on the go!
Apple | Android
Pin It
Thursday, August 30, 2012
Songza
One of my girlfriends told me about this new free music app, Songza, and I have to say I'm pretty obsessed with it! They have pre made playlists for the time of day and for certain activities! This morning I listened to Pop Wake-up Call and it really has been the perfect pick me up!
Check it out!!!
App downloads:
Apple | Android | Kindle Fire
Pin It
Check it out!!!
App downloads:
Apple | Android | Kindle Fire
Pin It
Thursday, August 23, 2012
Have you made your personal QR code?
Follow up to last week's post! Who out there has made a personal QR code? You could put the image on the back of your business card or on your resume! I have one linked to my LinkedIn page. How are you using yours?
How to Make a QR Code
Pin It
How to Make a QR Code
Don't forget to check out Norton Snap QR Code Reader!
Test our your QR Code Reader by scanning this:
Enjoy!
Pin It
Wednesday, August 22, 2012
How to Install Fonts
I love finding new fonts! Recently I sent a gift to a friend and I thought it would be fun to type her name and address in Harry Potter font to put on the package. She's a big Harry Potter fan.
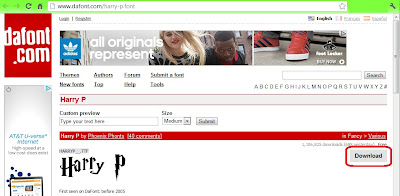
So I went to my favorite font website, www.dafont.com, searched for Harry Potter and found the font!
Here's how I installed the font:
They have so many fun fonts on www.dafont.com. Check it out and use some new fonts today!
Enjoy!
Pin It
So I went to my favorite font website, www.dafont.com, searched for Harry Potter and found the font!
My recent favorite font finds:
Always a good one for your Font collection:
Here's how I installed the font:
- After finding the font you want to install, click Download
- The file you download will most likely be a zip file. You'll have to unzip/extract the file to see the font files (.ttf or .otf). When you see the font files, keep this window open and visible to you on your computer.
- Now, open up your Control Panel on your computer.
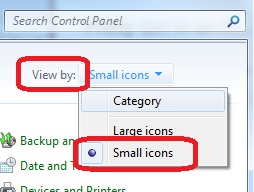
- On Windows, I like to view my Control Panel by Icons. The default is to view by Category but I just find everything difficult to find in that view.
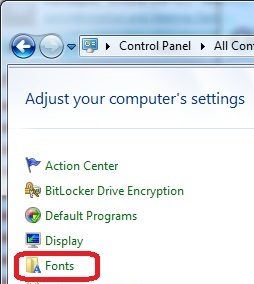
- Click on Fonts
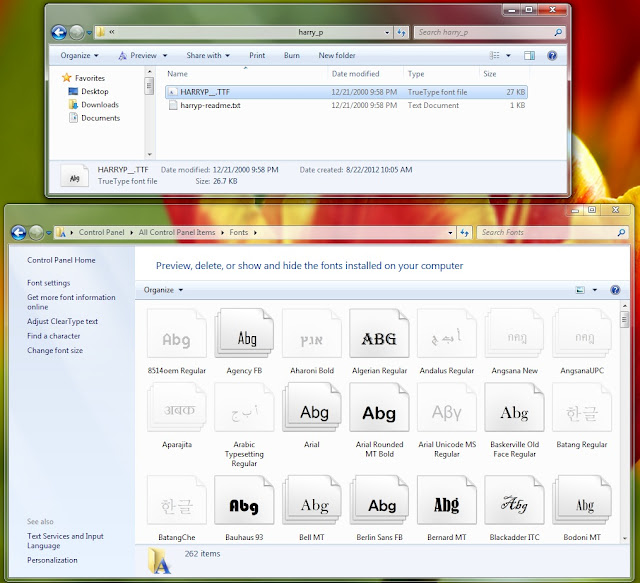
- Have your Control Panel Fonts and the Font files opened side by side.
- Drag the Font file (.ttf or .otf) you downloaded into your Control Panel Fonts window.
- When the file is done installing, scroll through your Control Panel Fonts to find your newly installed font.
- Open up any program and use your new font!

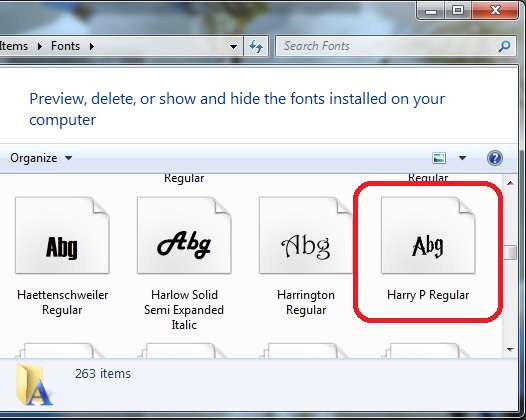
They have so many fun fonts on www.dafont.com. Check it out and use some new fonts today!
Enjoy!
Pin It
Friday, August 17, 2012
Updated Facebook Events & Birthdays Export
Well, as you can probably tell, Facebook updated its interface shortly after I made my how to! So I needed to update my instructions on how to export your Facebook Events to your mobile device or Google calendar! I imagine I may have to do this again in the future with Facebook's frequent updates!
I have quite a few events made and posted on Facebook and I wanted to be able to view my event calendar without logging into Facebook each and every time. I became determined to be able to view the events on my iPhone and/or on my Google calendar.
So here are the steps I took:
Pin It
I have quite a few events made and posted on Facebook and I wanted to be able to view my event calendar without logging into Facebook each and every time. I became determined to be able to view the events on my iPhone and/or on my Google calendar.
With the recent Facebook updates, you can now also export your friends' birthdays to your calendar! Never forget another birthday!
So here are the steps I took:
- Go to www.facebook.com in your browser
- Go to Events
- Click on the Options button (the toothed washer item) and then click "Export"
- The "Export Events and Birthdays" popup will appear. Right-click on the "upcoming events" link and choose "Copy Link Address."
- For the demo, I will just show how to do upcoming events, however you can do the exact same steps for Birthdays!

- Paste the link into an email to yourself so you can keep it for your records.
- Open the email on your mobile device and click on the link.
- Follow the steps on your mobile device to subscribe to this calendar. Wah lah! You are now subscribed to your Facebook Events Calendar.
- Want to subscribe to your friends' Birthdays too? Follow steps 1-7, just choose "export your friends' birthdays" during step 4 this time!
Want to add the calendar(s) to your Google Calendar? That's simple too!
- Open your Google Calendar and find the Other Calendars section.
- Click on the drop-down box and choose "Add by URL"
- Paste the URL that you emailed yourself earlier into the popup and done!
Enjoy!
Pin It
Tuesday, August 14, 2012
How to Make a QR Code
QR Codes have been all the craze lately. So I thought what a great addition to your business card, event agenda, or even a t-shirt! Sorority girls love their t-shirts.
Want to make one of your own? Just go to this website: http://zxing.appspot.com/generator/ and begin! Who knew that is was so simple to create one of these?!
Five Awesome QR Code Tricks
Enjoy!
Pin It
Want to make one of your own? Just go to this website: http://zxing.appspot.com/generator/ and begin! Who knew that is was so simple to create one of these?!
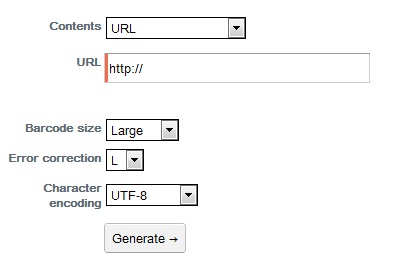
- Go to http://zxing.appspot.com/generator/
- Choose "URL" from the Contents drop down list
- Enter your website in the URL text box
- Choose the size of your QR Code in the "Bardode size" drop down list
- Click Generate
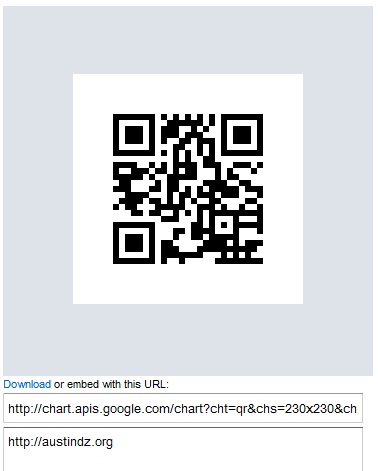
- Your new QR code will appear to the right.
- Click Download to save your new QR code
- It will open a new tab in your browser with only the image of your QR code
- Right-Click on the image and choose "Save image as"
- Save your new QR code
- Print it out, Test it, add it to whatever you wish!
Need a good app to scan QR codes from your phone?
I'm using Norton Snap QR Code Reader. Not only does it Scan the QR Code, but it checks it for malicious software before it opens the code on your phone!
There's lots of more good info on QR Codes from CNET here:
How to use QR CodesFive Awesome QR Code Tricks
Enjoy!
Pin It
Friday, August 3, 2012
Google Map Sharing
Did you know that you could save locations on a Google Map and then share and collaborate with others?
This works great when you are planning a weekend getaway with friends! I was able to save all our locations to one map, and then send that map over to my girlfriends! That is so much easier then having a list of addresses for everyone to google, or look up in their MAPSCO (does anyone still have one of those?). Also, they could add to and edit the map with me!
Here's how I did it:
Pin It
This works great when you are planning a weekend getaway with friends! I was able to save all our locations to one map, and then send that map over to my girlfriends! That is so much easier then having a list of addresses for everyone to google, or look up in their MAPSCO (does anyone still have one of those?). Also, they could add to and edit the map with me!
Here's how I did it:
- Go to https://maps.google.com/
- Click on "My Places"
- Click on "Create Map"

- Name your new map and choose your privacy settings

- Click Save
- Search for a location that you would like to add to your new map
- Once Google has found your location, click on the pin and choose "Save to Map"

- Choose the Map you would like to save to and click Save

- Do this for every location you need to add to your map
- Go back to your map by clicking "My Places"
- Once viewing your map, click "Collaborate"

- Add Collaborators by their email addresses and send invitations.

This is a great way to plan an event with others! I have certainly enjoyed using it with many organizations since I discovered it.
Need to send the link of the map to someone but don't want them to have access to edit it? Simple! Just click the link button. I personally love the short URL feature!
Enjoy!
Pin It
Friday, July 27, 2012
My new absolute favorite app is Flipboard. It is perfect for someone who is on the go but still wants to keep up to date with all of their favorite news and social media! I have Facebook, Twitter, Instagram and all of my news interests all in one application. Reading everything is as easy as a flip of the page! I even have Google Reader synced so I can check out all of my favorite blogs.
Check it out!
http://flipboard.com/
https://twitter.com/flipboard#
Pin It
Check it out!
http://flipboard.com/
https://twitter.com/flipboard#
Pin It
Wednesday, July 11, 2012
Facebook Events Export
This post has since been updated! Check out the new post!
I wanted to start a blog for those who aren't super techy but love those tech tips to help organize their daily lives! So for my first post I will share one of my recent favorite tips!
I don't know about you, but I'm a sorority girl, and we have tons of events! A lot of those events are made and posted on Facebook. Well I wanted to be able to view my event calendar without logging into Facebook each and every time. I became determined to be able to view the events on my iPhone and/or on my google calendar. So here are the steps I took:
- Go to www.facebook.com
- Go to Events
- Click on the magnifying glass and then click "Export Events"

- The "Export Events" popup will appear. Highlight the URL that appears in blue font and copy it.

- Email the link to yourself so you can have it for your records.
- Open the email on your mobile device and click on the link.
- Follow the steps on your mobile device to subscribe to this calendar. Wah lah! You are now subscribed to your Facebook Events Calendar.
Want to add the calendar to your Gmail Calendar? That's simple too!
- Open your Gmail Calendar and find the Other Calendars section.
- Click on the drop-down box and choose "Add by URL"
- Paste the URL that you emailed yourself earlier into the popup and done!
Well that's all for now. Please comment on what you would like to see next time and enjoy!
Pin It
Subscribe to:
Comments (Atom)


