Thursday, August 30, 2012

Songza

One of my girlfriends told me about this new free music app, Songza, and I have to say I'm pretty obsessed with it! They have pre made playlists for the time of day and for certain activities! This morning I listened to Pop Wake-up Call and it really has been the perfect pick me up!

Check it out!!!

App downloads:
Apple | Android | Kindle Fire


Pin It

Thursday, August 23, 2012

Have you made your personal QR code?

Follow up to last week's post! Who out there has made a personal QR code? You could put the image on the back of your business card or on your resume! I have one linked to my LinkedIn page. How are you using yours?

How to Make a QR Code


Don't forget to check out Norton Snap QR Code Reader!

Test our your QR Code Reader by scanning this: 

Enjoy!

Pin It

Wednesday, August 22, 2012

How to Install Fonts

I love finding new fonts! Recently I sent a gift to a friend and I thought it would be fun to type her name and address in Harry Potter font to put on the package. She's a big Harry Potter fan. 

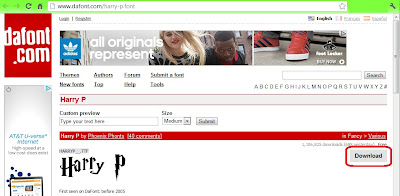
So I went to my favorite font website, www.dafont.com, searched for Harry Potter and found the font!


My recent favorite font finds:
 

Always a good one for your Font collection: 

Here's how I installed the font:
  1. After finding the font you want to install, click Download
  2. The file you download will most likely be a zip file. You'll have to unzip/extract the file to see the font files (.ttf or .otf). When you see the font files, keep this window open and visible to you on your computer.
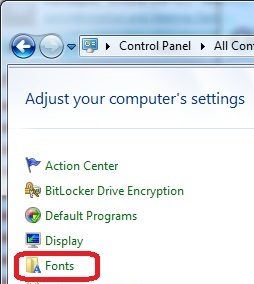
  3. Now, open up your Control Panel on your computer.
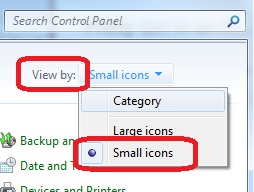
    • On Windows, I like to view my Control Panel by Icons. The default is to view by Category but I just find everything difficult to find in that view.
  4. Click on Fonts
  5. Have your Control Panel Fonts and the Font files opened side by side.
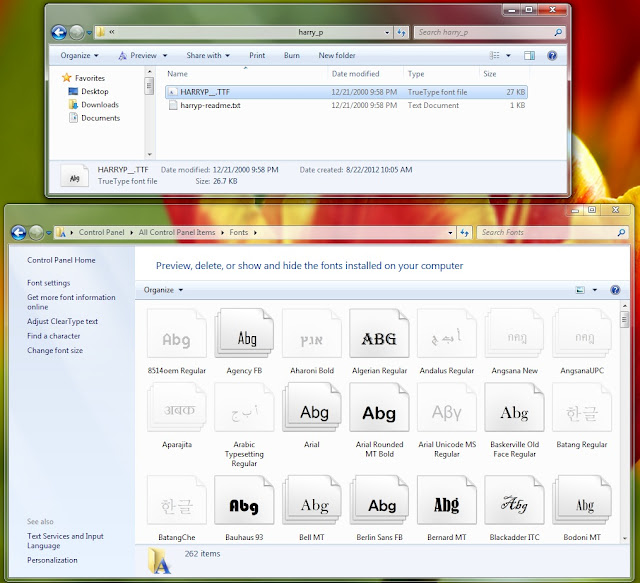
  6. Drag the Font file (.ttf or .otf) you downloaded into your Control Panel Fonts window. 
  7. When the file is done installing, scroll through your Control Panel Fonts to find your newly installed font.
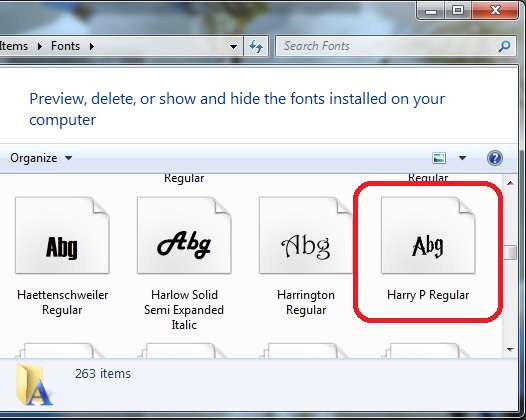
  8. Open up any program and use your new font!

They have so many fun fonts on www.dafont.com. Check it out and use some new fonts today!

Enjoy!
Pin It

Friday, August 17, 2012

Updated Facebook Events & Birthdays Export

Well, as you can probably tell, Facebook updated its interface shortly after I made my how to! So I needed to update my instructions on how to export your Facebook Events to your mobile device or Google calendar! I imagine I may have to do this again in the future with Facebook's frequent updates!

I have quite a few events made and posted on Facebook and I wanted to be able to view my event calendar without logging into Facebook each and every time. I became determined to be able to view the events on my iPhone and/or on my Google calendar.

With the recent Facebook updates, you can now also export your friends' birthdays to your calendar! Never forget another birthday!


So here are the steps I took:
  1. Go to www.facebook.com in your browser
  2. Go to Events
  3. Click on the Options button (the toothed washer item) and then click "Export" 
  4. The "Export Events and Birthdays" popup will appear. Right-click on the "upcoming events" link and choose "Copy Link Address." 
    • For the demo, I will just show how to do upcoming events, however you can do the exact same steps for Birthdays!
  5. Paste the link into an email to yourself so you can keep it for your records.
  6. Open the email on your mobile device and click on the link. 
  7. Follow the steps on your mobile device to subscribe to this calendar. Wah lah! You are now subscribed to your Facebook Events Calendar.
  8. Want to subscribe to your friends' Birthdays too? Follow steps 1-7, just choose "export your friends' birthdays" during step 4 this time!
Want to add the calendar(s) to your Google Calendar? That's simple too!
  1. Open your Google Calendar and find the Other Calendars section.
  2. Click on the drop-down box and choose "Add by URL"
  3. Paste the URL that you emailed yourself earlier into the popup and done! 

Enjoy!

Pin It

Tuesday, August 14, 2012

How to Make a QR Code

QR Codes have been all the craze lately. So I thought what a great addition to your business card, event agenda, or even a t-shirt! Sorority girls love their t-shirts. 

Want to make one of your own? Just go to this website: http://zxing.appspot.com/generator/ and begin! Who knew that is was so simple to create one of these?!

  1. Go to  http://zxing.appspot.com/generator/
  2. Choose "URL" from the Contents drop down list
  3. Enter your website in the URL text box
  4. Choose the size of your QR Code in the "Bardode size" drop down list
  5. Click Generate
  6. Your new QR code will appear to the right. 
  7. Click Download to save your new QR code
  8. It will open a new tab in your browser with only the image of your QR code
  9. Right-Click on the image and choose "Save image as" 
  10. Save your new QR code
  11. Print it out, Test it, add it to whatever you wish!
Need a good app to scan QR codes from your phone? 
I'm using Norton Snap QR Code Reader. Not only does it Scan the QR Code, but it checks it for malicious software before it opens the code on your phone! 

There's lots of more good info on QR Codes from CNET here: 
How to use QR Codes
Five Awesome QR Code Tricks

Enjoy!
Pin It

Friday, August 3, 2012

Google Map Sharing

Did you know that you could save locations on a Google Map and then share and collaborate with others?

This works great when you are planning a weekend getaway with friends! I was able to save all our locations to one map, and then send that map over to my girlfriends! That is so much easier then having a list of addresses for everyone to google, or look up in their MAPSCO (does anyone still have one of those?). Also, they could add to and edit the map with me!

Here's how I did it:
  1. Go to https://maps.google.com/
  2. Click on "My Places"
  3. Click on "Create Map"                                     
  4. Name your new map and choose your privacy settings
  5. Click Save
  6. Search for a location that you would like to add to your new map
  7. Once Google has found your location, click on the pin and choose "Save to Map"                                                                 
  8. Choose the Map you would like to save to and click Save
  9. Do this for every location you need to add to your map
  10. Go back to your map by clicking "My Places"
  11. Once viewing your map, click "Collaborate" 
  12. Add Collaborators by their email addresses and send invitations.
This is a great way to plan an event with others! I have certainly enjoyed using it with many organizations since I discovered it. 

Need to send the link of the map to someone but don't want them to have access to edit it? Simple! Just click the link button. I personally love the short URL feature!


Enjoy!


Pin It